 This tutorial was created in PSP X but can be easily done in other versions. I have also rated this as intermediate as I have few screen shots and brief explanations. This tutorial was written by me and is ©momentzdesignz Any other tutorial that looks similar is purely coincidental and no infringement of any other artist is intended. For this tutorial you will need the following: PSP X Tube of your choice Plugin - Toadies - Ommadawn 1 - Choose your tube and copy 2 - Open new image to the exact size of your tube 3 - Choose a background color that compliments your tube 4 - Flood fill your new background with your chosen color 5 - Copy and paste your tube on the new background as a new Layer 6 - Still on your Tube layer > Effects > 3D Effects> Drop Shadow Settings: V & H 10, Opacity 50, Blur 5 and color - black 7 - Layers > Merge > Merge All Flatten 8 - Make a duplicate copy and minimize - we will use as a pattern in our frame. Back to the image we are working on 9 - Effects > Texture Effects > Texture > Tin Foil - [see screenshot below] 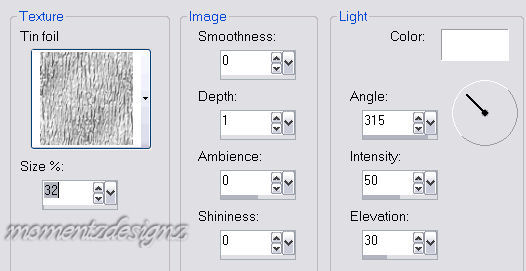 10 - Effects > 3D Effects > Buttonize Settings: H and W 10, Opacity 46, transparent checked, color #808080 11 - Set Foreground to dark color from your image 12 - Set Background to a gold gradient of choice 13 - Add border - 2 px - flood fill with gold gradient 14 - Add border - 2 px - flood fill with Foreground color 15 - Add border - 2 px - flood fill with gold gradient 16 - Image > Add border - 30 px 17 - Select with the magic wand 18 - In Materials box - change your Foreground to Pattern 19 - Find the copy of your image that we miminized earlier 20 - Flood fill the border 21 - Keep Selected 22 - Effects > Texture Effects > Mosaic Antique Settings: # of columns & rows 50, tile diffusion 70, grout width 2, grout diffussion 50 23 - Keep selected 24 - Effects > Texture Effects > Fine Leather Settings: Color - #DCDCDC, angle 30, blur, 40, transparency 250, # of furrows 40 and length of furrows 4 25 - Selections > Select None 26 - Repeat steps 13, 14 & 15 for your 3 small borders 27 - Image > Add border - 40 px 28 - Floodfill this border with the same pattern 29 - Effects > Plugins > Toadies > Ommadawn Settings: 85, 52, 80 and 100 30 - Keep Selected 31 - Effects > 3D Effects > Inner Bevel Settings: Bevel #2, width 8, smoothness 0, depth 6, ambience -7, shininess 1, color - white, angle 315, intensity 50 and elevation 30 32 - Selections > Select none 33 - Repeat steps 13, 14 & 15 for your 3 small borders 34 - Add decorative corners as you wish 35 - Add watermark, re-size if necessary and save as a .jpg Thank you and I hope you have enjoyed this tutorial :o) ©momentzdesignz - 1999 |