 This tutorial is simple and could be done in any version. Supplies Needed: Image of choice Gold pattern of choice Red Satin pattern - download Poinsettia tube - download 1 - Open your image, duplicate and close the original. 2 - Set Foreground to red satin pattern and Background to your gold pattern. 3 - Image > Add Border - 3 px 4 - Select the border and flood fill with your gold pattern. 5 - Selections > Invert 6 - Effects > 3D Effects > Buttonize Settings: H 20, W 20, Opacity 26 and check Transparent 7 - Selections > Select none 8 - Image > Add Border - 2 px and Flood fill with red satin pattern 9 - Image > Add Border - 3 px and flood fill with gold pattern 10 - Selections > Select None 11 - Image > Add Border - 35 px and Flood fill with red satin pattern 12 - Keep Selected 13 - Effects> Reflection Effects > Kaleidoscope - see screen shot below: 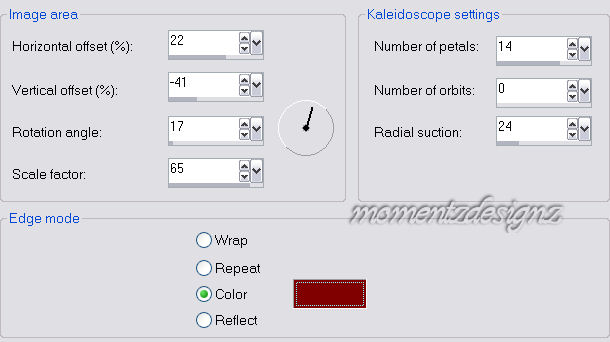 14 - Keeping selected: Adjust > Blur > Gaussian Blur 3 15 - Repeat Adjust > Blur 16 - Selections > Select None 17 - Image > Add Border - 3 px and Flood fill with your gold pattern. 18 - Image > Add Border - 50 px and Flood fill with red satin pattern 19 - Image > Add Border - 3 px and Flood fill with your gold pattern. 20 - Image > Add Border - 2 px and Flood fill with your red satin pattern. . 21 - Image > Add Border - 3 px and Flood fill with your gold pattern. 22 - Selections > Select None 23 - Festive decorative corners will look lovely on this simple frame and I have included the poinsettia tube for you if you wish. 24 - Add watermark, re-size and save as a jpg. If you have any questions, please feel free to email me. ©momentzdesignz 1999 Back to Tutorials |